Interior Design Mood Boards: Key Points
- Mood boards show design vision.
- They build client trust.
- They can be physical, digital, or hybrid.
- Mood boards include colors, textures, furniture, and lighting.
- They boost portfolios and career success.
Introduction
Mood boards are the heartbeat of any interior design project. Whether you’re a DIY decorator, an aspiring designer, or a professional working with clients, a mood board helps transform ideas into clear, compelling visuals. In this guide, we’ll explore how to create an interior design mood board that not only organizes your ideas, but also communicates your concept with confidence.
Keep reading to learn how to master the art of the interior design mood board and how this essential tool can elevate your projects!
A mood board in interior design is more than just a collage of pretty pictures. It’s a strategic tool that designers use to capture the overall concept of a project. Think of it as a snapshot of your design vision; a way to communicate the colors, textures, and mood you want a space to reflect before making big purchases or changes.
At its core, a concept mood board interior design project answers three questions:
- What feeling should the space give?
- What elements will work together to create that feeling?
- How can we make sure the client understands the vision before anything is ordered or installed?
Why Designers Use Mood Boards
Mood boards serve both creative and practical purposes:
- Idea Exploration: Designers can freely play with styles, palettes, and inspiration without commitment.
- Decision-Making: Mood boards narrow choices down to what fits the project best.
- Client Communication: Clients often struggle to imagine a designer’s vision. A board makes it clear and visual.
- Project Alignment: Everyone involved—clients, contractors, vendors—stays on the same page.
Beyond Just a Collage
Some people confuse a mood board with an inspiration board or a scrapbook. The difference? A mood board for interior design is focused. Meaning, every image or material included has a reason for being there. It should tell a clear story about the space you’re creating.
For example:
- A modern living room mood board might combine cool grays, sleek metal accents, and clean-lined furniture.
- On the other hand, a coastal bedroom mood board could show soft blues, natural rattan textures, and airy linens.
In both examples, they uniquely set the tone for what’s ahead.
Why This Matters for Your Career
If you’re an aspiring designer, being able to answer “what is a mood board in interior design” with confidence shows that you understand one of the industry’s most fundamental tools. Many clients judge professionalism not just on final results, but on how well you can present and explain ideas along the way.
In short, a mood board is a designer’s bridge between imagination and reality. It’s the first step in bringing both your creativity and your client’s dream to life!
Why Every Designer Needs a Mood Board
If you ask a professional interior designer what tool they cannot live without, chances are they’ll say a mood board for interior design. That’s because mood boards are more than creative exercises. They’re essential tools that guide the design process from start to finish.
Here’s why they matter so much:
Visualizing Ideas Clearly
It’s not always easy to explain a vision with words. You might describe a “coastal-inspired living room with natural textures and soft blues,” but your client might imagine something totally different.
A mood board for interior design fixes this problem. It shows exactly how your ideas look together. Instead of guessing, everyone can see the big picture.
- Clients no longer have to rely on imagination.
- Designers can test how colors, patterns, and textures blend.
- Contractors and vendors gain a visual guide to follow.
For example, imagine you’re designing a rustic kitchen. Without a board, you might say “dark wood cabinets, stone counters, and matte black hardware.” But put those samples together on a board, and suddenly the client sees how everything connects!
Enhancing Client Communication
Design is personal. Clients want to feel heard and involved in the process. A mood board helps build trust by giving them something concrete to react to.
Benefits for client relationships include:
- Buy-In: Clients feel part of the process when they help shape the board.
- Fewer Misunderstandings: Clear visuals reduce back-and-forth revisions.
- Confidence: Clients are more willing to approve purchases once they’ve seen the vision.
Streamlining the Design Process
Interior design projects involve many moving parts. Without clear direction, costs can spiral and timelines can stretch. Another benefit of a mood board is that it helps keep everything focused!
Here’s how it helps:
- Faster Decision-Making: Narrow down options early.
- Fewer Costly Mistakes: Test styles and colors before buying.
- Smoother Workflow: Designers, contractors, and clients all follow the same vision.
- Consistent Results: The finished space matches the original design intent.
EXAMPLE: You’re working on a small apartment living room. Without a mood board, you might order a sofa, only to later realize it clashes with the chosen rug. With a board, you would have noticed the mismatch ahead of time and saved both money and stress.
Professional Credibility
When you present a polished interior design mood board, you immediately set yourself apart. It shows that you:
- Think strategically, not just creatively.
- Understand industry-standard processes.
- Can communicate ideas like a professional.
For students or aspiring designers, this is especially important. Mood boards are often the first portfolio pieces clients or employers will see. A strong board proves you know how to turn inspiration into a real plan.
In short, mood boards are not “optional.” Rather, they are the foundation of great design! They help you visualize, communicate, and execute ideas while also building client trust and professional credibility.
Become an Interior Designer in Just 3 Months
Train at home & on your own time with QC Design School!
Types of Interior Design Mood Boards (Digital vs Physical)
There’s no single way to make a mood board. Designers choose the format that works best for their project, client, and workflow. In fact, most professionals experiment with more than one method. The three main approaches are physical mood boards, digital mood boards, and hybrid mood boards.
Physical Mood Boards
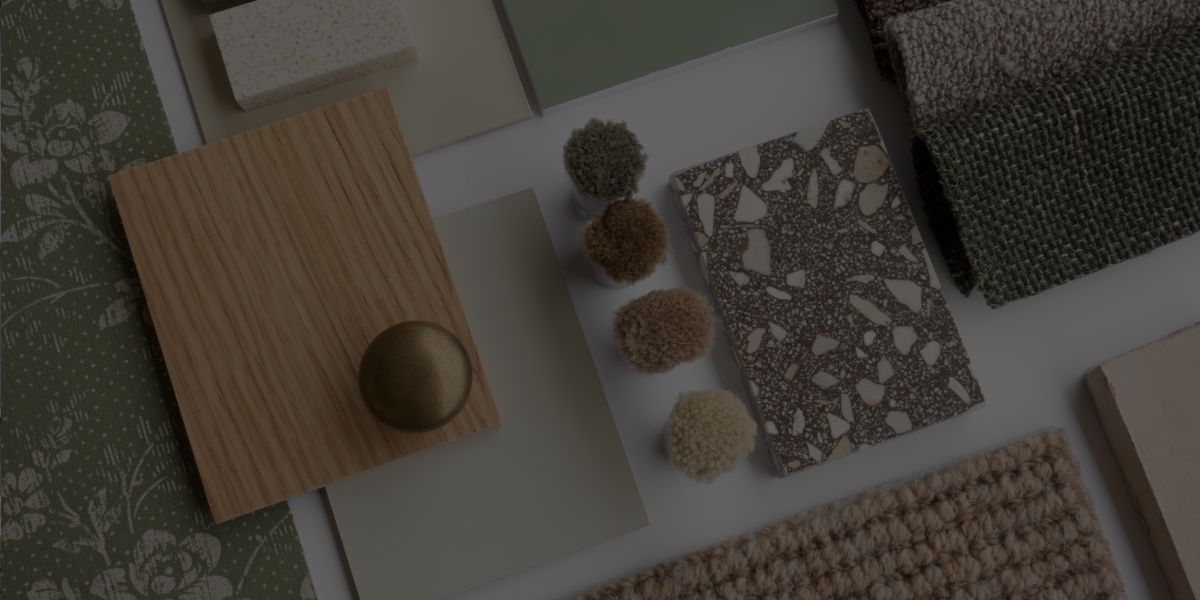
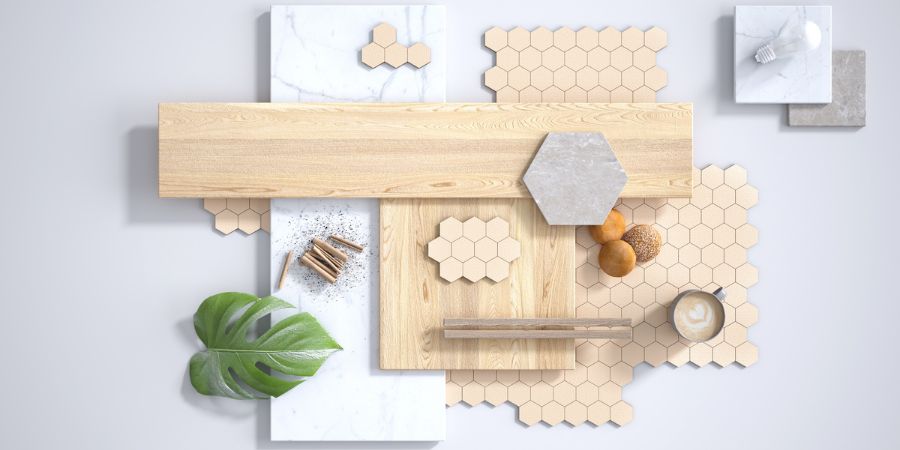
Firstly, a physical mood board for interior design is a hands-on collection of real samples. Designers arrange fabric swatches, paint chips, wood finishes, and photos on a board or in a tray.
Why they’re effective:
- Tactile experience — clients can touch fabrics or hold paint chips under different lighting.
- True-to-life colors and textures that digital screens can’t always match.
- Creates an engaging, interactive presentation during in-person meetings.
What to include on a physical board:
- Paint or wallpaper swatches
- Flooring samples (wood, tile, carpet)
- Fabric swatches for upholstery and curtains
- Hardware and finish samples (brass, chrome, matte black)
- Printouts of furniture and décor items
Pros:
- Highly realistic
- Great for client confidence
- Easy to update with new samples
Cons:
- Gathering materials can be time-consuming or costly
- Less portable for remote clients
- Harder to share digitally

Digital Mood Boards
Next, a digital interior design mood board creator is a software or online tool that allows you to build boards virtually. Canva, Adobe Illustrator, Photoshop, and Morpholio Board are popular options.
Why they’re effective:
- Easy to edit, rearrange, and update
- Simple to share with clients online
- Ideal for virtual design work or portfolios
Common tools and uses:
- Canva: Drag-and-drop templates, free starter option
- Adobe Illustrator/Photoshop: Precise, professional boards for advanced users
- Morpholio Board: Tailored for interior design, includes sourcing links
- Pinterest: Quick way to gather inspiration in one place
Pros:
- Saves time
- Portable and easy to send via email or link
- Unlimited options for layout and design
Cons:
- Screen colors may not match real-life tones
- Can feel less personal than physical boards
- Requires a learning curve with some software

Hybrid Mood Boards
Finally, many professionals prefer a hybrid approach. They create a digital board for clarity and online sharing, then bring physical samples to client meetings.
Why hybrids stand out:
- Best of both worlds: digital convenience + tactile realism
- Allows clients to experience textures in person while still having a polished file to reference
- Works especially well for larger projects where accuracy is critical
EXAMPLE: A designer might email a digital board to a client, then present fabric swatches and flooring samples during an in-person consultation.
Which Format Should You Use?
It depends on your project:
- Physical boards: Best for luxury clients or local, in-person projects.
- Digital boards: Perfect for e-design, online portfolios, and quick collaboration.
- Hybrid boards: Ideal for striking a balance between efficiency and impact.
No matter which you choose, the goal is the same: a concept mood board interior design project that clearly communicates your vision and builds trust with your client.
How to Create a Mood Board for Interior Design (Step-by-Step Guide)
Creating a mood board is a structured process, not guesswork. Whether you’re a student, a professional, or a DIY decorator, following a clear workflow ensures your board feels cohesive and polished. Below is a step-by-step guide on how to create a mood board for interior design that you can use for any project.
Step 1: Gather Inspiration (Pinterest, Magazines, Photography)
Every mood board begins with inspiration! So, start collecting visuals that reflect the mood or story you want the space to tell.
Where to look:
- Pinterest boards for room styles and trending looks
- Interior design magazines (ELLE Decor, Architectural Digest)
- Instagram or Houzz project galleries
- Real-life photos of textures, landscapes, or architecture
Step 2: Define Your Concept and Style
Once you’ve gathered enough visuals, the next step is to identify a unifying concept. This becomes the foundation of your interior design mood board.
Begin by asking yourself:
- What design style am I aiming for (modern, farmhouse, coastal, bohemian)?
- Which emotions should the space evoke (calm, vibrant, luxurious)?
- What story am I telling (family-friendly comfort, sleek professional space)?
From there, write down 3–5 descriptive words. These words act as a filter for what makes it onto your board. For instance, “cozy, natural, timeless” might lead to warm wood tones, woven fabrics, and a neutral palette.
Step 3: Select a Color Palette and Textures
Color and texture set the tone of any space. This step ensures your mood board feels intentional rather than random.
How to build your palette:
- Choose 2–3 main colors that define the mood.
- Add 2–3 supporting tones (neutrals or accents).
- Include one bold accent to add personality.
Texture options to include:
- Soft textiles like velvet, linen, or wool
- Natural finishes like stone, marble, or raw wood
- Metals like brass, chrome, or matte black
Step 4: Source Furniture, Lighting & Decor Images
Now it’s time to add the pieces that bring your concept to life! Search online or in catalogs for items that fit your palette and style.
Include visuals of:
- Core furniture pieces (sofa, bed, dining table)
- Accent pieces (chairs, ottomans, side tables)
- Lighting fixtures (chandeliers, sconces, pendants)
- Decorative items (rugs, art, mirrors, plants)
Step 5: Choose Your Format (Physical, Digital, or Hybrid)
Decide which format works best for your project:
- Physical: Use trays or foam boards to layer real swatches and samples.
- Digital: Use software tools (Canva, Photoshop, Morpholio Board).
- Hybrid: Build a digital base but bring physical swatches to client meetings.
This choice depends on your workflow and whether you’ll be presenting to clients online or in person.
Step 6: Assemble Your Mood Board
Here’s where the magic happens! Begin arranging your elements into a cohesive layout.
Tips for assembly:
- Start with your foundation (paint colors, flooring, large furniture).
- Layer on mid-sized elements (fabrics, lighting, art).
- Add smaller details last (hardware, accessories).
- Group items that belong together to mimic a room layout.
Digital Boards: Use grids, templates, or freeform layouts depending on the look you want.
Physical Boards: Use neutral trays or foam boards so the background doesn’t distract.
Step 7: Review, Edit, and Finalize for Presentation
Don’t stop once everything is placed. Instead, step back and evaluate your board critically. Furthermore, ask yourself:
- Does the board tell a clear, cohesive story?
- Are any elements clashing?
- Is the balance between colors, textures, and styles right?
- Would the client immediately “get it” without explanation?
Trim what doesn’t fit, then refine the arrangement. Remember to aim for simplicity and clarity.
Bonus Tip: Document Your Process
Take photos of your physical board or save versions of your digital board as you edit. This can then become a part of your design portfolio. Clients (and future employers) LOVE seeing how ideas evolve.
By following all of the above steps, you’ll know exactly how to create a mood board for interior design that feels professional, intentional, and client-read!
Learn To Master Mood Boards and More
Earn your certification + book your first client in just 12 weeks!
Best Tools for Interior Design Mood Boards
Choosing the right tool can make or break your workflow. A strong interior design mood board creator should be flexible, easy to use, and able to communicate your vision clearly. The best part? You don’t need expensive software to get started!
Here’s a breakdown of both free and professional tools designers use today.
Free Tools (Beginner-Friendly)
1. Pinterest
- Great for gathering inspiration quickly.
- Lets you save and organize images into boards.
- Acts as a digital “scrapbook” of ideas.
- Easy to share with clients.
⚠️ Limitation: Pinterest boards aren’t polished presentations. Rather, they’re better for brainstorming than for final client pitches.
2. Canva
- Drag-and-drop interface with free templates.
- Upload product images or use Canva’s stock photo library.
- Add color swatches, text labels, and simple layouts.
- Ideal for students, beginners, or DIY decorators.
⚠️ Limitation: Canva templates can look “cookie-cutter” if overused. So, aim to customize layouts to match your brand style.
- Captures entire Pinterest boards or online layouts in one click.
- Saves them as PNGs or PDFs for client sharing.
- A handy add-on to pair with other tools.
Professional Tools
- The gold standard for professional designers.
- Offers complete control over image placement, scaling, and text.
- Perfect for creating polished, branded layouts.
- Allows precise color matching with hex codes and CMYK.
⚠️ Limitation: There’s a bit of a steep learning curve for beginners.
- Excellent for editing product photos before adding them to your board.
- Can remove backgrounds and create clean, cutout furniture images.
- Useful for high-end client presentations.
⚠️ Limitation: This software is time-intensive and requires training.
- Best for multi-page presentations (great if your mood board is part of a bigger design proposal).
- Clean, print-ready output.
- Lets you integrate boards directly into larger client documents.
- Specifically designed for interior designers.
- Includes built-in libraries of products, finishes, and materials.
- Lets you add sourcing links for clients.
- Offers polished, professional-looking layouts.
⚠️ Limitation: App-based (iOS only), so it’s not as accessible for all users.
Interior Design Mood Board Creators & Templates
If you’re pressed for time, pre-made templates are lifesavers! Many design schools, blogs, and software platforms offer them. Moreover, templates help you:
- Skip the blank-page anxiety.
- Maintain a consistent format for clients.
- Focus on design instead of layout.
Which Tool Should YOU Choose?
- Beginners or DIY decorators: We suggest starting with Canva or Pinterest. They’re easy and free.
- Aspiring professionals: Learn Illustrator or Morpholio Board. These tools help you build client-ready presentations and portfolios.
- Career designers: Combine multiple tools. For example, use Photoshop to clean product images, then drop them into an Illustrator board.
No matter your level, the goal is the same: choose an interior design mood board creator that helps you tell your story in the clearest, most professional way possible.
Key Elements of a Professional Mood Board
A polished interior design mood board isn’t just about pretty pictures. Each element on your board serves a purpose. Together, these elements create a cohesive story that communicates both the look and the feel of a space. When building a concept mood board interior design project, here are the core components every designer should include.
Color Schemes
Color is the foundation of mood. A client might say they want their space to feel “calm,” “energizing,” or “luxurious.” Your color palette is what delivers that feeling.
”There are a lot of color associations in today's world, and there are several different ways that humans react to [colors]. There are learned behaviors to color, and they're learned because they're part of our culture, how we think about things, how we're trained to think about color, etc. There are also physical reactions we can have to color that are innate; we're born with them. No matter where you live in the world, we all respond the same way to colors."
Jane LockhartBAAID • QC Design School Expert
How to build a strong palette:
- Base colors: 2–3 main shades that set the overall mood (e.g., neutrals like white, beige, gray).
- Accent colors: 1–2 hues that add depth or interest (e.g., navy blue, emerald green).
- Highlight color: One bold shade used sparingly for personality (e.g., gold, coral, mustard).
EXAMPLE: A modern minimalist palette may include crisp white, soft gray, and matte black with a pop of warm wood. A coastal design could feature sandy beige, ocean blues, and bright white with woven accents.
Textures & Materials
Texture adds dimension. Without it, even the most stylish design can feel flat. Thus, including materials on your board helps you (and your clients) imagine how the space will feel, not just how it looks.
Types of textures to include:
- Textiles: Cotton, linen, velvet, wool.
- Hard surfaces: Stone, marble, ceramic tile, polished concrete.
- Natural materials: Rattan, wicker, reclaimed wood.
- Metals: Brass, chrome, copper, matte black finishes.
Layering swatches of different textures shows how contrasts play together. For instance, pairing rough stone with smooth leather creates balance and sophistication.
Furniture & Accessories
Furniture anchors your mood board. These are the big-ticket items that define how the space functions and looks. Accessories add personality and polish.
What to include:
- Core furniture: Sofas, beds, dining tables, chairs.
- Supporting pieces: Coffee tables, side tables, ottomans.
- Accessories: Rugs, pillows, lamps, mirrors, artwork, plants.
Lighting & Finishes
Lighting can transform a room more than almost any other element. It affects color perception, mood, and functionality. Finishes tie the look together with subtle but powerful details.
Lighting to feature:
- Statement chandeliers
- Wall sconces
- Pendant lights
- Task lamps
Finishes to consider:
- Cabinet hardware
- Faucet styles
- Door handles
- Trim or molding details
Inspirational Imagery & Lifestyle Shots
Finally, add images that go beyond products. These set the overall tone and emotional direction of the project.
Ideas to include:
- Lifestyle photos (family gathering in a cozy living room, elegant dinner setup).
- Architectural shots (arches, beams, staircases) that inspire your design.
- Natural scenes (beaches, forests, cityscapes) that influence your palette.
This step reinforces the storytelling aspect of your board. For example, a board inspired by Tuscany might feature rustic stone textures, terracotta tones, and vineyard imagery.
Pulling It All Together
A professional mood board always balances these five elements: color, texture, furniture, lighting, and inspiration. When they work together, the result is a design vision that feels polished, intentional, and client-ready.
Remember: a concept mood board interior design project should tell a complete story, not just show a collection of items.
How to Present Your Mood Board to Clients (Or For Your Portfolio)
A mood board only reaches its full potential when it’s presented well. Even the best design can fall flat if the client doesn’t understand your vision. Knowing how to present an interior design mood board is a professional skill that builds trust, secures approvals, and strengthens your portfolio.

Storytelling Through Mood Boards
Every mood board should tell a story. When presenting, don’t just show a collection of items—explain the “why” behind each choice!
Tips for storytelling:
- Start with the overall theme. (“This space is designed to feel airy, coastal, and relaxing.”)
- Explain color psychology. (“Blue evokes calm, while sandy tones add warmth.”)
- Highlight connections. (“The woven rattan chair ties back to the natural fiber rug.”)
Professional Tips for Client Buy-In
Clients need to feel confident before they approve a design. Here’s how to build trust when presenting your board:
DO:
- Keep it clean: Avoid clutter. Too many options confuse clients.
- Organize clearly: Group items (furniture, fabrics, finishes) so the flow is easy to follow.
- Engage clients: Ask questions like, “Does this palette feel right to you?”
- Prepare alternatives: Have backup options for one or two key pieces.
- Show variety: Present both functional and aesthetic elements.
DON’T:
- Overwhelm with endless variations.
- Use low-quality images or inconsistent photo styles.
- Skip explaining the reasoning behind choices.
- Forget to connect the board back to the client’s goals.
EXAMPLE PRESENTATION: Imagine you’re showing a mood board for interior design of a modern farmhouse kitchen. Instead of just pointing to the brass faucet, explain how mixing brass with matte black hardware creates depth, adds contrast, and avoids a flat “one-tone” look.
Adding Mood Boards to Your Interior Design Portfolio
A strong interior design mood board can be as powerful as photos of finished rooms because it shows your thought process. As such, you should include them in your projects because:
- Clients love seeing how ideas evolve.
- Employers want proof that you understand design workflows.
- Boards highlight creativity, organization, and presentation skills.
You can showcase them in your portfolio by:
- Including high-resolution images of your best boards.
- Showing “before and after”: inspiration → mood board → completed space.
- Labeling boards clearly (e.g., “Coastal Living Room Mood Board – Client Project”).
- Using both digital and physical examples if possible.
Why This Matters for Aspiring Designers
Presenting mood boards well is a career-defining skill. It shows clients that you’re not just a decorator, but a professional who can guide them through a process with clarity and confidence.
In short: Presenting a mood board is not just about showing images — it’s about telling a story, winning client trust, and proving your value as a designer. Done right, your boards can seal approvals and strengthen your portfolio.
Graduate Spotlight: Laicee Charette of Laicee’s Interiors
Real work. Real confidence. Real results.
“What surprised me the most about learning a hands-on skill in an online format is how easy it was to navigate. I’m definitely not a tech-savvy person but QC Design School made it so easy to find my assignments, complete them, and even get REAL feedback from a professional. My training has made me feel confident in owning my own business at just 22 years old! You’ll be a PRO when you graduate from QC Design School. Thank you, QC, for helping me feel confident with my skill-set!”


Final Thoughts: Elevate Your Career with Interior Design Mood Boards
An interior design mood board is far more than a collage of swatches and images. It’s the foundation of every great design project. From the very first spark of inspiration to the final reveal, mood boards guide your process, clarify your vision, and ensure clients feel connected every step of the way.
By now, you’ve learned:
- What a mood board is in interior design and why it’s such a powerful tool.
- How mood boards help you visualize ideas, communicate with clients, and streamline projects.
- The different types of boards—physical, digital, and hybrid—and when to use them.
- The step-by-step process of how to create a mood board for interior design, from gathering inspiration to presenting a polished final product.
- The key elements (color, texture, furniture, lighting, inspiration) that make your board professional.
- Expert strategies for presenting mood boards to clients or showcasing them in your portfolio.
When used well, mood boards are more than just design tools, they’re career tools. They demonstrate your ability to think creatively, organize ideas visually, and communicate like a professional. Ultimately, this is what sets successful designers apart from hobbyists!
Take the Next Step with QC Design School
At QC Design School, we teach you more than just the basics. In our self-paced, online Interior Design & Decorating certification course, you’ll learn how to:
- Build professional mood boards that impress clients.
- Translate those boards into functional, stylish spaces.
- Create a polished portfolio that showcases your skills.
- Launch your career with confidence in a growing industry.
With the right training and tools, you’ll not only create stunning boards; you’ll design spaces that inspire and transform lives.
Ready to master mood boards and start building your dream career? Enroll in QC’s Interior Design & Decorating Course today!
Interior Design Mood Boards FAQs
What is a mood board in interior design?
A mood board in interior design is a visual tool that combines colors, textures, furniture, and images to capture the overall feel of a project. It helps designers communicate their vision clearly and ensures clients understand the concept before work begins.
What should be included in a concept mood board for interior design?
A concept mood board interior design project should include: a color palette, fabric and material samples, furniture images, lighting, accessories, and inspirational photos. These elements together tell the story of the design and create a cohesive vision.
What is the best interior design mood board creator?
For beginners, Canva and Pinterest are easy and free. For professionals, Adobe Illustrator, Photoshop, and Morpholio Board are top tools. The best interior design mood board creator depends on your needs: quick inspiration, client presentations, or polished portfolios.
How do you create a mood board for interior design step-by-step?
To create a mood board for interior design:
- Gather inspiration.
- Define your concept.
- Select colors and textures.
- Source furniture and decor.
- Choose physical, digital, or hybrid format.
- Assemble your board.
- Review and finalize.
Do professional interior designers still use physical mood boards?
Yes! Many designers still use physical mood boards with swatches, paint chips, and samples. They offer a tactile experience digital boards can’t. Today, most professionals use a hybrid approach: digital boards for convenience and physical samples for texture and color accuracy.
Can I make an interior design mood board for free?
Absolutely. Free tools like Canva and Pinterest make it easy to create boards. They’re great for beginners and DIY decorators. As you grow professionally, consider moving to Illustrator, Photoshop, or Morpholio for polished, client-ready presentations.
What is the difference between a mood board and a concept board in interior design?
A mood board shows the look and feel of a design using colors, textures, and imagery. A concept board goes further, often including layouts, materials, and technical details. Mood boards inspire; concept boards guide execution.
