- The interior design process turns ideas into real spaces.
- The 7 steps are: consultation, concept, planning, development, visualization, implementation, and styling.
- Each step defines goals, manages budgets, and guides clients through every stage.
- Digital tools like SketchUp and Canva make planning faster and more accurate.
- QC Design School teaches these steps through hands-on projects and expert tutor feedback.
Introduction
Every great interior design project starts with a plan. Whether you’re decorating a single room or managing a full renovation, success comes from following a structured process. The interior design process is the roadmap that turns creative ideas into livable, functional, and beautiful spaces! Moreover, it’s how professional designers stay organized, meet client needs, and bring each project to life with confidence.
So, keep reading to explore the full interior design process, and learn how professional designers manage every stage from concept to completion!
Understanding the Interior Design Process
Before a single paint color is chosen or a sofa is ordered, every successful project begins with structure. The interior design process gives that structure. At its core, this process is a mix of creative vision and practical planning. It guides designers from the first client meeting through to the final styling day, ensuring each detail supports the bigger picture.
Whether you’re designing a modern condo, a cozy family home, or a luxury office space, these stages help you transform ideas into reality.
Why the Interior Design Process Matters
Without a process, even the most creative ideas can fall apart. Think about it: every interior design project comes with challenges—tight timelines, changing budgets, and endless decisions. Following a structured plan helps you:
- Stay organized and efficient. You’ll know what to do, when to do it, and who’s responsible.
- Communicate clearly with clients. Each step provides a chance to get feedback and build trust.
- Balance beauty with functionality. Great design isn’t just about how a space looks; it’s about how it feels and works.
- Deliver consistent results. A defined process keeps quality high, even across different projects.
When new designers skip or rush steps, mistakes happen. For instance, there may be missed measurements, mismatched colors, or budget overruns. But a clear process will help keep the project on track, as well as help clients feel confident in your professionalism.
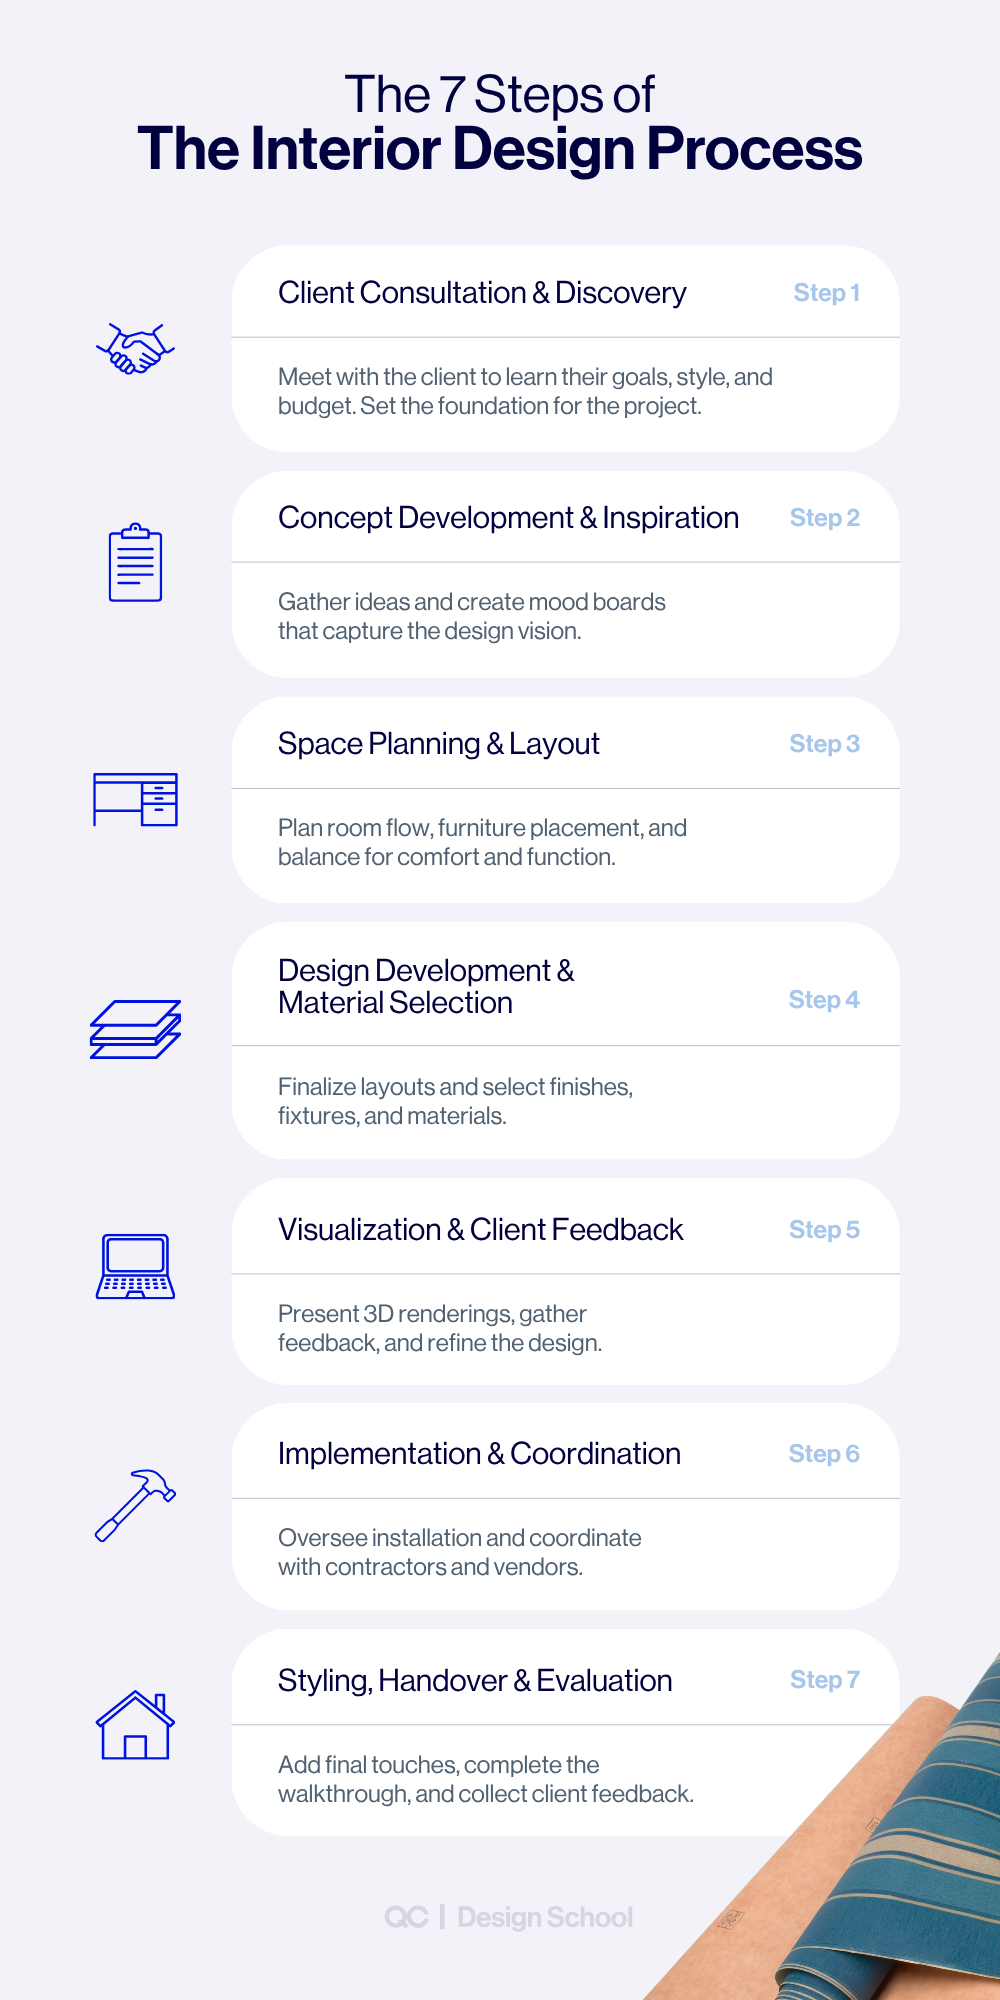
The 7 Key Stages of a Professional Design Workflow
While every firm has its own workflow, most interior design professionals follow seven major steps. These stages are recognized across the industry and used by both independent decorators and large firms alike:
- Client Consultation and Project Discovery – Understanding your client’s needs and goals.
- Concept Development and Inspiration – Creating a vision through mood boards, sketches, and research.
- Space Planning and Layout – Designing the flow, functionality, and furniture arrangement.
- Design Development and Material Selection – Turning ideas into detailed drawings and material plans.
- Visualization and Client Feedback – Presenting renderings and refining based on client input.
- Implementation and Project Coordination – Managing installation, contractors, and quality control.
- Styling, Handover, and Post-Project Evaluation – Adding finishing touches and ensuring client satisfaction.
These steps in the interior design process help you manage creativity, logistics, and communication all at once. Furthermore, they also provide a professional rhythm that can adapt to ANY interior design project, whether it’s a single-room makeover or a large commercial renovation.
So, let’s take a look at each one a little deeper, shall we?
Step 1: Client Consultation and Project Discovery
To begin, every interior design project starts with understanding your client’s needs. The consultation stage is where trust, direction, and clarity are built. It’s the first chance to align your creative vision with the client’s lifestyle, goals, and budget.
Establishing the Client Relationship
This first meeting helps you learn what the client wants—and what they truly need. So, ask questions about things like their daily routines, design style, problem areas, etc. Encourage them to share photos or inspiration boards with you.
Here, you’ll also explain your workflow so clients properly understand your steps in the interior design process. Clear communication now prevents misunderstandings later!
Budget, Timeline, and Vision Alignment
The next part of Step 1 involves discussing the project’s budget, timeline, and scope. Provide an overview of design fees, estimated material costs, and expected completion dates. Honest conversations about cost and expectations save EVERYONE stress down the line (trust us). Also, make sure to document everything in a proposal or service agreement, as this further builds trust and professionalism.
Basically, a strong consultation lays the groundwork for a smooth, enjoyable experience. It’s where creativity meets planning and the interior design process truly begins.
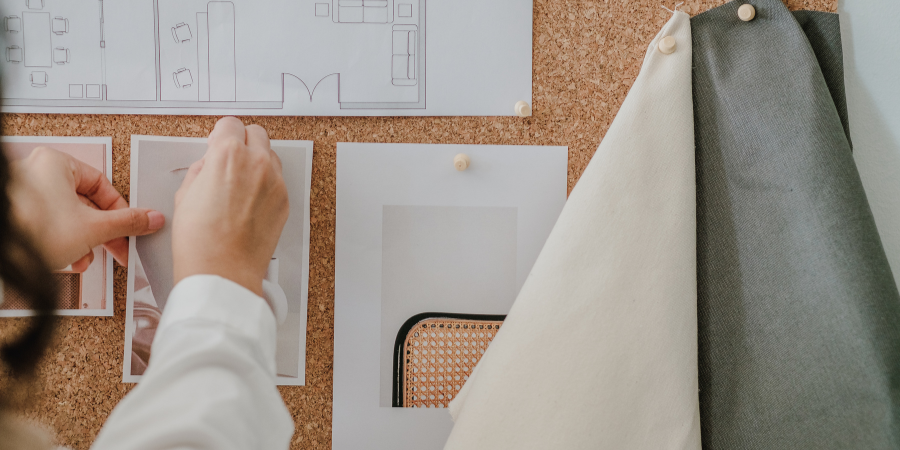
Step 2: Concept Development and Inspiration
Once the client’s goals are clear, it’s then time to shape their vision into a cohesive plan. The concept development stage turns ideas into something tangible and exciting. Here, creativity begins to shine!
Research and Ideation
So, start by collecting inspiration. Create mood boards filled with colors, textures, and styles that reflect the client’s personality and project goals. Look to magazines, design websites, and real-life spaces for fresh ideas.
Digital tools like Pinterest, Canva, and Morpholio Board make this easy. Many designers also sketch rough layouts or use software like SketchUp or AutoCAD to explore early concepts.
During this phase, focus on building a design story (a.k.a. the clear visual direction that ties every element together).
Creating a Design Concept Presentation
After researching and brainstorming, you’ll share your ideas with the client. A professional presentation helps them visualize the overall direction of the project.
Include:
- Mood boards with color schemes and finishes.
- Concept statements that explain your vision.
- Preliminary sketches or 3D images that show flow and proportion.
Encourage feedback and make small adjustments before moving forward. This stage is critical because it ensures everyone is aligned before diving deeper into the next interior design stages.
Step 3: Space Planning and Layout
With a clear concept in place, the next step is to make sure the space works as beautifully as it looks. Space planning is one of the most technical and vital stages in the interior design process because it focuses on balance, function, and flow.
Functional Flow and Zoning
To achieve any successful room layout, you first need to understand how people move through a room. Designers create zones for different activities—such as cooking, relaxing, or working—so each area feels purposeful and comfortable.
When planning, consider:
- Traffic flow: Make movement easy and natural.
- Proportion: Keep furniture sizes in balance with the room.
- Accessibility: Ensure comfort for all users.
Thoughtful interior design planning transforms awkward spaces into seamless, livable environments.
Tools and Technology for Space Planning
Modern designers rely on digital tools to refine layouts. Programs like AutoCAD, SketchUp, or Roomstyler make it simple to test furniture arrangements, circulation patterns, and lighting placement. Using software also helps you present clear visuals to clients, thereby making it easier for them to understand your design intent before anything is built.
As you can see, space planning bridges creativity and practicality, ensuring that every interior design project functions just as beautifully as it looks.
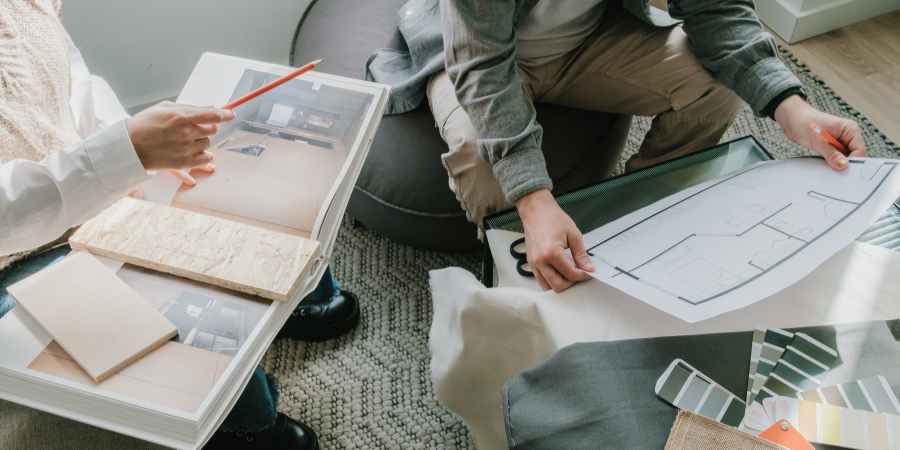
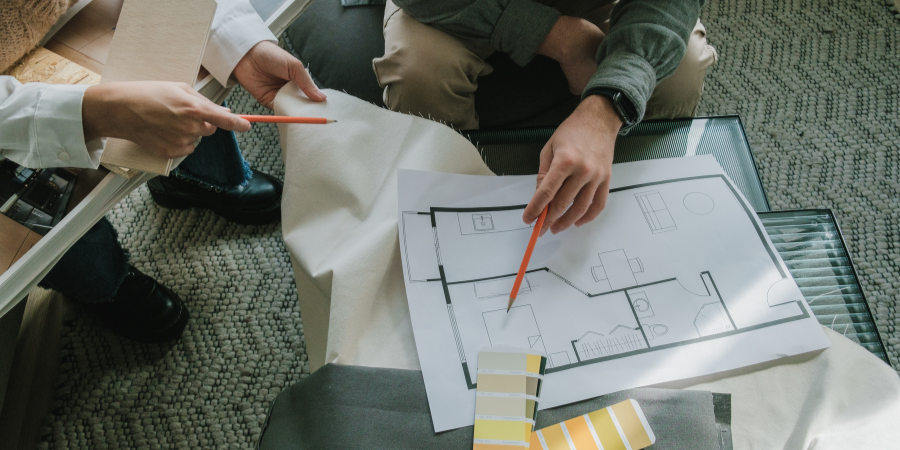
Step 4: Design Development and Material Selection
Now that the space plan is set, it’s time to turn your concept into detailed, build-ready plans. This stage of the interior design process brings every idea to life through drawings, specifications, and real-world materials.
Turning Concepts into Detailed Plans
In this phase, designers refine layouts and prepare technical documents that contractors can follow. Typical drawings include:
- Floor plans and elevations that show dimensions and layout.
- Lighting and electrical plans for proper ambiance and safety.
- Cabinetry or millwork details for built-ins and storage.
These plans become the blueprint for the entire project! They help ensure accuracy, control costs, and communicate clearly with builders and suppliers.
Materials, Finishes, and Fixtures
Choosing finishes is where design personality truly stands front and center. Here, you’ll select paint colors, flooring, fabrics, and hardware that align with your client’s vision.
Keep these points in mind:
- Durability: Choose materials that last.
- Maintenance: Pick surfaces that fit the client’s lifestyle.
- Sustainability: Whenever possible, use eco-friendly or locally sourced options.
- Cohesion: Make sure textures and colors flow naturally from room to room.
Careful material selection balances style with practicality, ensuring that your interior design project looks professional, functions well, and stands the test of time!
Step 5: Visualization and Client Feedback
By this stage of the interior design process, your ideas finally come to life (how exciting!). Visualization helps clients see exactly how their space will look before a single wall is painted or a piece of furniture is ordered.
Presenting 3D Renderings and Virtual Walkthroughs
Modern software makes it easier than ever to show clients realistic previews of their spaces. Tools like SketchUp, Revit, and 3ds Max allow you to build lifelike renderings that include lighting, finishes, and furniture layouts.
Sharing these visuals helps clients:
- Understand the design’s scale and proportions.
- Visualize color, texture, and balance.
- Feel more confident approving your ideas.
Additionally, some designers even use virtual tours or augmented reality apps to walk clients through the design before work begins.
Incorporating Feedback and Revisions
Once clients review your presentation, gather their input. Encourage open discussion, as it builds trust and ensures the final design truly reflects their goals. We also recommend using this stage to make small adjustments to layouts, materials, or finishes. Professional designers document revisions clearly so every decision is approved before moving forward.
By combining technology with collaboration, this step ensures your interior design project feels polished and client-approved before implementation begins.
Step 6: Implementation and Project Coordination
Now comes the exciting part: actually turning your design into reality! During the implementation stage, all your planning, drawings, and selections come together in the real world. Strong coordination keeps the project running smoothly and ensures that every detail matches your vision.
From Plans to Reality: Working with Contractors and Vendors
Also during this phase, designers collaborate closely with contractors, suppliers, and installers. Clear communication is essential to avoid mistakes or delays!
Most designers will:
- Review quotes and confirm contracts.
- Schedule deliveries and installations.
- Oversee work to make sure it follows design drawings.
- Resolve any issues quickly and professionally.
As you can see, this part of the interior design process is very hands-on, requiring organization and problem-solving skills. Great designers know how to keep everyone, from clients to contractors, on the same page.
Site Visits, Quality Control, and Sustainability Checks
Keep in mind that regular site visits will help maintain quality and progress. And during these inspections, ensure to check that materials, finishes, and furniture all match specifications. Many professionals also focus on sustainability, ensuring waste is minimized and materials are responsibly handled.
Keep accurate records of every decision through photos, notes, and schedules. After all, this protects both you and the client! By managing logistics and communication effectively, you’ll ensure the interior design project is delivered on time, on budget, and beautifully executed.
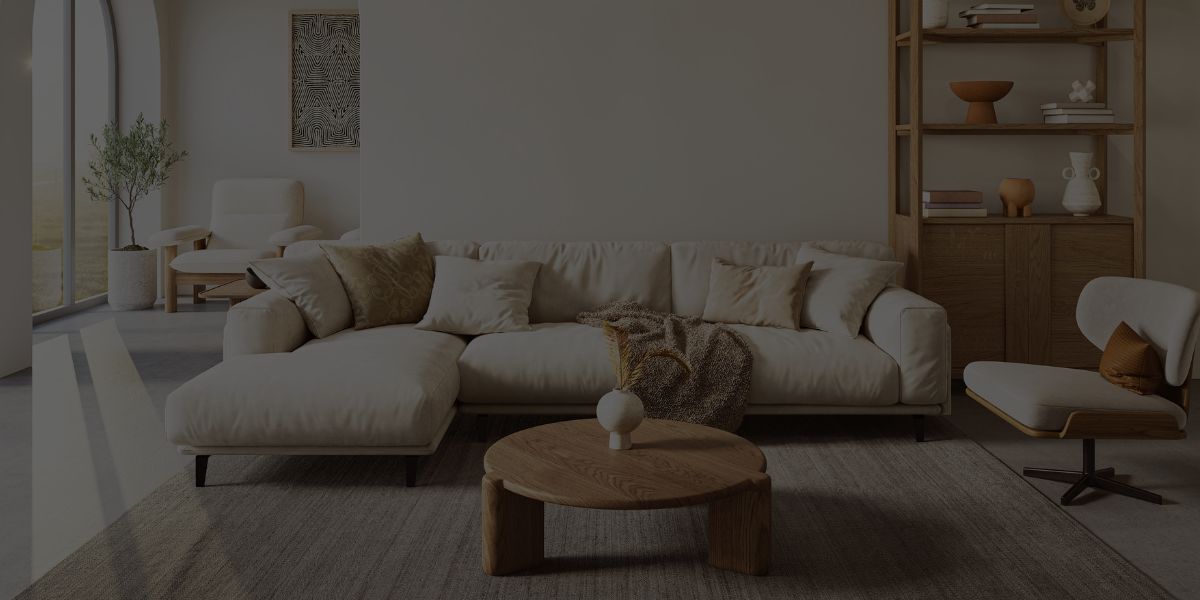
Step 7: Styling, Handover, and Post-Project Evaluation
The final step of the interior design process is where everything comes together. After months of planning, coordination, and creativity, it’s time to add the finishing touches and hand the project over to your client.
Styling and Accessorizing the Finished Space
Styling is what transforms a great design into a breathtaking one! This is the part where you layer textures, arrange furniture, and add decor pieces that make the space feel personal and complete.
Focus on:
- Balancing scale and proportion when arranging furniture.
- Mixing lighting types for both function and mood.
- Using textiles, plants, and artwork to add warmth and personality.
Oh, and don’t forget to take professional photos of the completed space for your portfolio or website. These images are powerful tools for growing your career and showing future clients what you can do!
Post-Occupancy Evaluation and Client Follow-Up
All that to be said, your work isn’t finished after the styling day. You still need to check in with your clients afterwards! Not only does this show professionalism; it also shows clients that you truly care.
For instance, you might:
- Schedule a quick walkthrough to confirm they’re happy with the results.
- Offer maintenance tips for materials and finishes.
- Ask for feedback, testimonials, or referrals.
This final step is the very thing that builds long-term relationships and turns satisfied clients into repeat customers. A thoughtful handover ensures your interior design project ends on a high note, leaving clients delighted and proud of their new space.
How Planning Builds Confidence
Professional designers don’t just design, they plan. Interior design planning is where the art meets the business side of creativity. When you have a defined process, you can then quote timelines accurately, schedule trades efficiently, and manage changes smoothly.
For example:
- A new designer might create a simple visual checklist for each phase.
- Experienced designers often use project management platforms like Asana or DesignFiles to track progress.
- Larger teams rely on shared digital folders and floor plan software to collaborate in real time.
This combination of creativity and organization separates amateurs from professionals. It’s also one of the first skills you’ll build in QC Design School’s self-paced, online Interior Design & Decorating Course—learning how to take your creative ideas and translate them into structured, successful projects!
Expert Tips for Mastering the Interior Design Process
Becoming a great designer takes both creativity and consistency. Thus, here are 5 expert tips to help you master each stage of the interior design process and manage every project with confidence.
- Communicate often and clearly. Keep clients updated through every phase. Clear communication builds trust and prevents misunderstandings.
- Stay organized. Use project management tools like Asana, Trello, or DesignFiles to track tasks, budgets, and timelines.
- Balance beauty and function. A space should look stunning but also fit how people live, work, and move.
- Plan before purchasing. Always finalize your layouts and measurements before ordering furniture or materials.
- Keep learning. Stay current with new materials, color trends, and digital design tools.
- Be flexible. Every interior design project will have surprises—adapt quickly and problem-solve creatively.
- Document everything. From client feedback to product details, keeping written records saves time and stress later.
REMEMBER: successful designers aren’t just artists. They’re planners, communicators, and lifelong learners. When you refine your workflow, you’ll deliver better results and enjoy the creative process even more.
(Oh, and did you know that as a QC Design School student, you’ll get 4 months FREE of DesignFiles as part of your course tuition? It’s true!)
Build Your Career with QC Design School
Mastering the interior design process is one of the most valuable skills you can have as a designer. When you understand every step (from client consultation to final styling), you can confidently take on any project, big or small!
At QC Design School, you’ll learn exactly how to do that. Our self-paced, online Interior Design & Decorating Course walks you through each phase of a real-world design project, helping you build both creative and professional skills.
As part of your certification training, you’ll learn how to:
- Create detailed floor plans, color schemes, and mood boards.
- Plan spaces that are both functional and beautiful.
- Communicate confidently with clients and contractors.
- Build a professional portfolio with personalized tutor feedback.
- Launch or grow your design business with confidence.
Whether you’re just learning how to start interior design as a career or you’re ready to refine your current skills, QC’s training gives you EVERYTHING you need to succeed!
Ready to take your next step? Learn more about QC Design School’s Interior Design & Decorating Course and start mastering the professional interior design process today!
“How did I land my first clients? Word of mouth ... About 90% of my work is referral and repeat business. Start by offering your services to people you know while completing your course!”
Angie ChapmanAward-Winning Interior Design Consultant • QC Design School Expert
FAQs About The Interior Design Process
What are the main steps in the interior design process?
Most professional designers follow seven key stages: consultation, concept development, space planning, design development, visualization, implementation, and final styling. Together, these steps keep every interior design project organized and efficient.
How long does the interior design process take?
It depends on the project size and complexity. Small decorating projects can take a few weeks, while large renovations may take several months from start to finish.
What software do interior designers use?
Designers often use AutoCAD, SketchUp, Revit, or DesignFiles for drawings and renderings. Tools like Canva or Morpholio Board also help create mood boards and client presentations.
Do all interior design projects follow the same stages?
Yes, but the amount of time spent in each phase may vary. For example, commercial projects often require more detailed documentation, while residential jobs focus more on styling and personal touches.
How do I start a career in interior design?
Begin by learning the fundamentals—color theory, space planning, and client communication—through a trusted online program like QC Design School’s Interior Design & Decorating Course. You’ll build real-world skills and a professional portfolio.
You can learn even more about launching a successful career in interior design with our full Career Guide!
What’s the difference between design development and implementation?
Design development refines drawings, materials, and finishes. Implementation is when the design becomes reality through coordination, installation, and site management.
Why is the interior design process so important?
A structured process helps designers stay organized, manage client expectations, and deliver consistent results. It’s the key to turning creative ideas into practical, beautiful spaces.