Want to know how to become an interior decorator? Get professional certification training! Only through a proper education can you best understand the fundamentals of this profession – such as taking and drawing correct measurements.
QC Design School tutor, Tammy Hart, I.D.D.P, CAPS is a certified interior decorating specialist. She’s also a Certified Aging in Place Specialist from the National Association of Home Builders. Tammy is the owner and award-winning designer for the Designer Chick Co., as well as the Past Director on the National Board for DDA (formerly CDECA).
How to Become an Interior Decorator: Measuring 101
As an interior decorator, one of the most challenging skills to acquire and perfect is the art of measuring spaces, objects, and trims. (And then from there, turning initial sketches into scaled floorplans.) Have you ever heard the saying, “Measure three times – cut once”? This is applicable when measuring a client’s space, minus the cutting part. After all, the success of your measurements is key in the success of your project!
For example, if you were to measure a space incorrectly, or improperly draw to scale, your client’s new sofa may not fit. Measuring and drawing is done in steps. This article will guide you through measuring windows, doors, and trim. Moreover, I’ll help you learn how to measure a room and draw it to scale.
So, let’s get started!
Measuring Doors
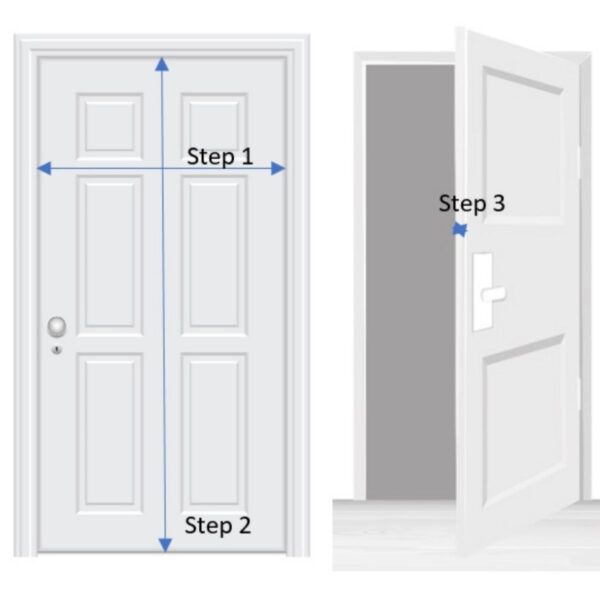
Your goal here is to measure the door size. Another way to think about this is measuring the opening the door fits in. When measuring a door, you are NOT including the trim measurement. Your focus is literally the door.
Door Image Sources from Vecteezy.com.
Step 1
Measure the width of the door – a.k.a. from the right edge of the door to the left edge of the door. This is an important measurement because you need to know the door swing. Only then can you create a scaled floorplan.
Step 2
Measure the height of the door – a.k.a. from the bottom of the door to the top of the door. In a scaled drawing (or aerial view), you don’t see the height. All the same, it’s critical that you know these particular measurements!
Step 3
Measure the door depth.
Measuring Windows
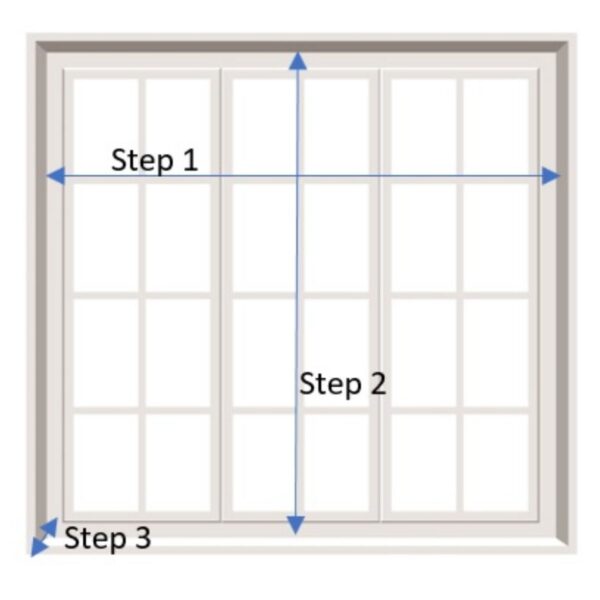
Your goal here is to measure the window size. Another way to think about this is measuring the opening the window fits in. When measuring windows, you are NOT including the trim measurement. Again, your focus is just the window.
Window Image Source from Vecteezy.com.
Step 1
Measure the width of the window – a.k.a. from the right edge of the window to the left edge of the window.
Step 2
Measure the height of the window – a.k.a. from the bottom of the window to the top of the window. In a scaled drawing (also known as aerial view), you don’t see the height. As I mentioned before, though, you still need to know it!
Step 3
Measure the window depth.
Measuring Trim
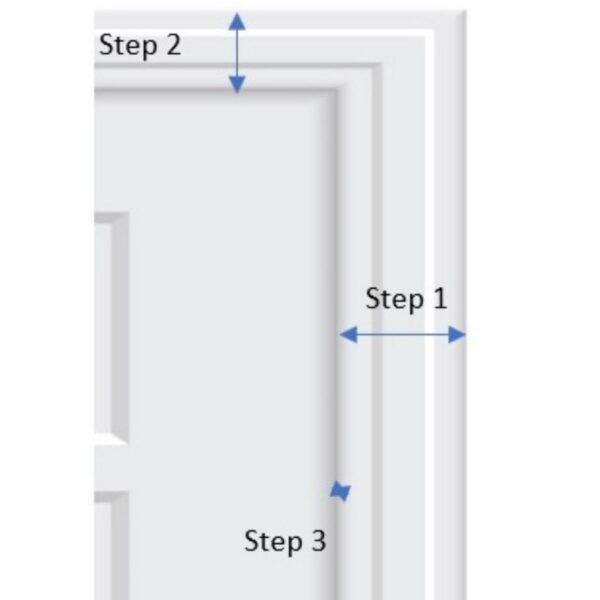
When learning how to become an interior decorator, another thing you’ll discover is how to measure trim. Whether measuring door, window, or baseboard trims, all trim is measured using the exact same process.
Door Image Source from Vecteezy.com.
Step 1
Measure the width of the trim.
Step 2
Measure the height of the trim.
Step 3
Measure the trim depth.
Note: When measuring trim for a door or a window, you’ll also measure the total height and width around the door or window, too. (I.e., from floor to top of trim and from left to right of trim.)
How to Become an Interior Decorator: Drawing Doors and Windows
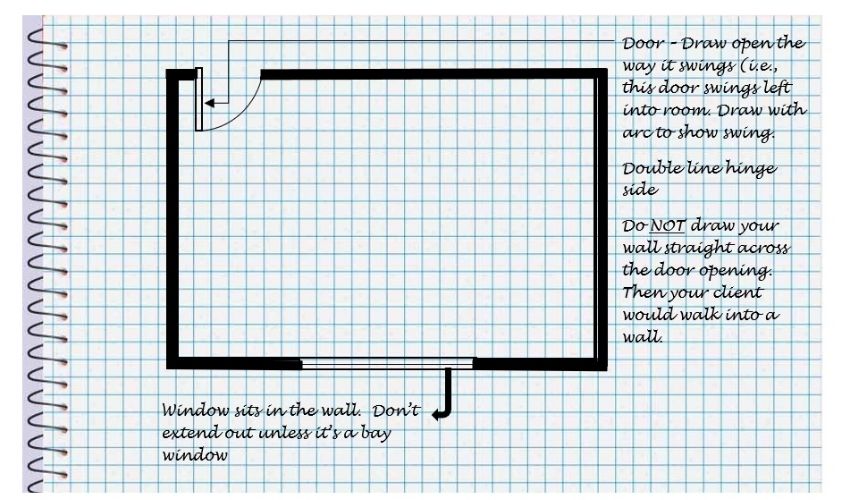
Below is an example of how to draw a door and a window in a floorplan. Ensure that you’re using the correct symbols for the door and window type you are drawing.
(Feel free to pause for a moment to learn more about different floorplan symbols here!)
Graph Paper Image Source from Vecteezy.com.
Now that we’ve reviewed how to measure and draw windows, doors, and trim, let’s review how to measure and draw a room to scale. When measuring floor pace or wall length, I normally use a measuring tape over a laser measure.
Personally, I’ve found that sometimes a laser measure can be off by an inch. So, I choose to use a measuring tape along the floor. Most ceilings are either 8’, 9’ or 10’. Any time I have a room taller than 10’, I’ll use my laser measure, since most ceilings will go to an exact foot.
How to Become an Interior Decorator: Drawing in Scale
Let’s start by reviewing scale. Think of drawing in scale as what your room layout will look in real life. If done correctly, what fits in your scale drawing will fit in your client’s actual room.
You can do a scaled drawing in:
- ¼” = 1’
- ½”=2’
- ¾”=3’
- 1”=4’
Here’s how I think of it: each square on a piece of graph paper is ¼”. So, every time you draw a ¼” on a piece of graph paper, you are drawing 1’ in real life. The graph paper below has been enlarged for you to see what I mean.
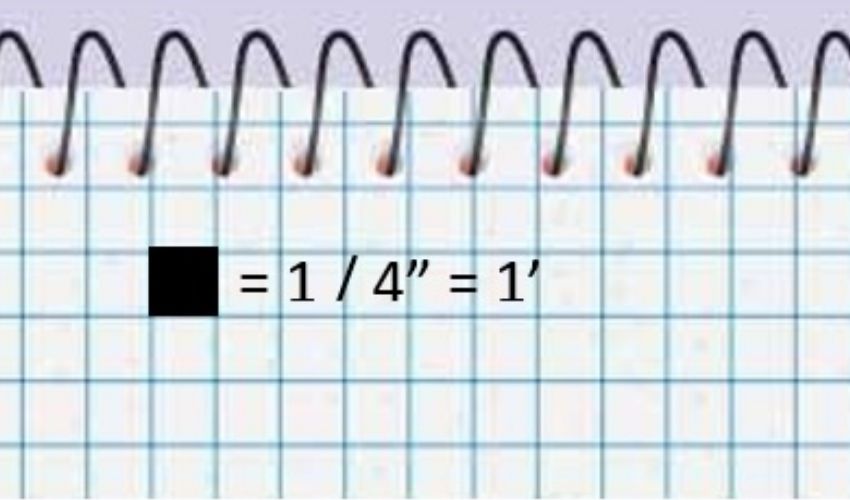
I’ll use a larger scale (e.g. ½”=2’) if I have a small space and find that a scale of ¼”=1’ is going to be to small of a visual.
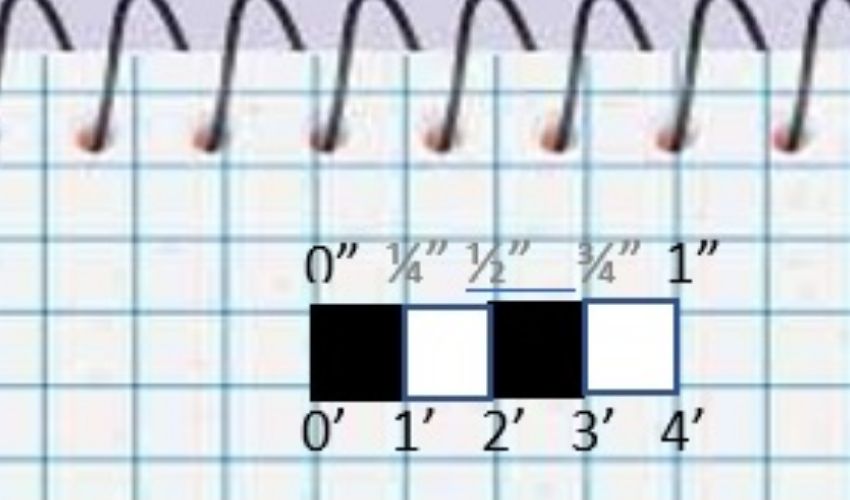
Below, I’ve drawn a scale. You can see the relationship between the top line (in units of inches) and the bottom line (in units of feet). You can see that:
- 0”=0’
- ¼”=1’
- ½”=2’
- ¾”=3’
- 1”=1’
So, if you draw a line that spans 4 boxes/1”, you are drawing a line that equals 4’ in real life. Remember: you draw a scale on any scaled drawing. However, you do NOT draw a scale on a rough drawing (such as on-site freehand drawings or quick sketches). Scaled drawings are always drawn and presented on plain white paper, rather than on graph paper.

How to Become an Interior Decorator: Let’s Draw!
Now that you have a better understanding of measuring and drawing a few elements, let’s actually draw. Let’s play with this example:
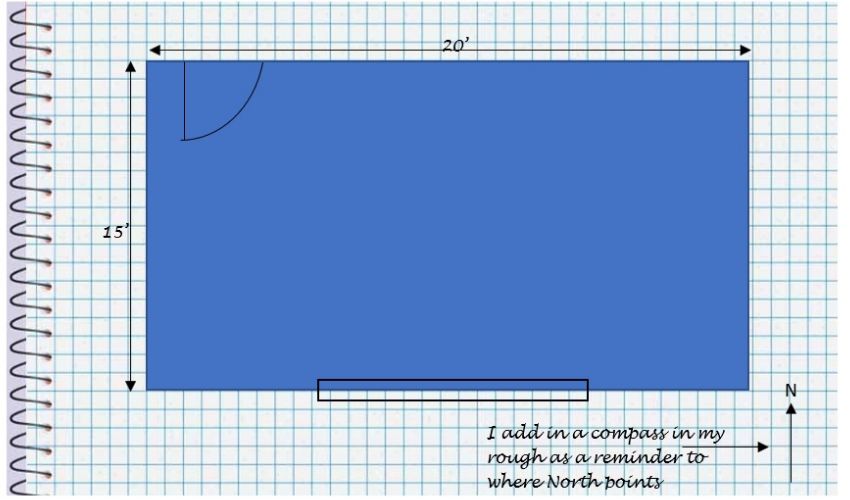
Your client’s room is 20’ wide x 15’ long. It has one door that’s 36” wide, with a left inward swing in the top left quadrant. In the center of the bottom wall, the room also has a single hung window that’s 8’ wide.
Step 1: Create a Freehand Rough Sketch
In your freehand sketch, note if there are any architectural details in the room. If so, go ahead and label them as a clarifying note to yourself/team.
Step 2: Create a Scaled Drawing From Your Rough Drawing
Your scaled drawing will be an accurate drawing that reflects your client’s room. The only real difference is that your drawing will be mini-sized (scaled down), so that it fits onto a piece of paper.
This is always drawn on plain white paper and in artist’s marker. It should depict thickened walls (about an 1/8th”, since interior walls are thinner than exterior walls) and use ¼”=1’scale. For the purposes of teaching, I’ll draw on graph paper so you can see scale.
Make sure to include the following:
- Title block in the right-hand corner that lists your client’s name, space, your business name, scale, scale notation, and compass.
- Thickened walls. To draw thickened walls, first draw your walls to fit the size of the room. Next, thicken them about an 1/8” or half a square by drawing a border around your room and then shading in the space between the room walls and the border.
Do NOT include any measurements showing in your scaled drawing.
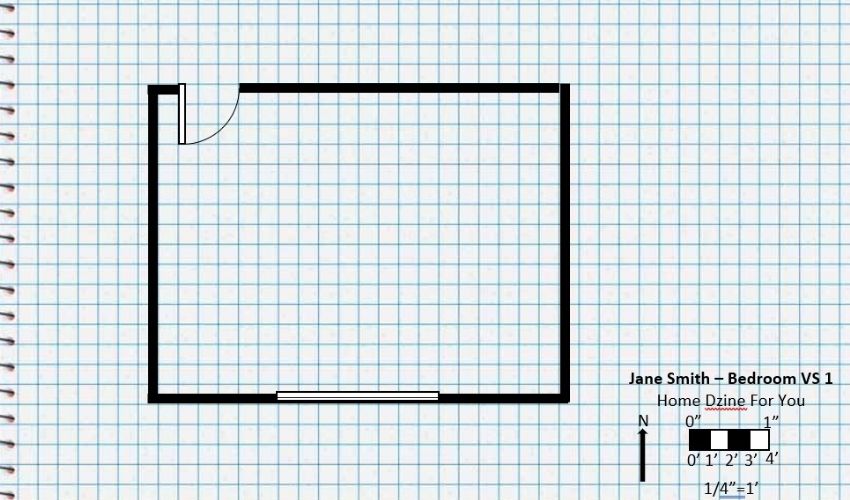
Now that you’ve drawn your scaled plan, you can now start measuring and drawing in furniture. This is where your scaled stencil comes in handy.
Armed with your QC Design School certification training and this knowledge, you’ll have no problem becoming a successful interior decorator, capable of making all sorts of floorplans for your clients. Plus, the more you practice, the better your floorplans will be. So, keep on practicing!

